Interface-Based Method
interface gi0/0
 ip ospf 1 area 0

interface gi0/1
 ip ospf 1 area 0
OSPF enables directly on the interface.
Interface-Based Configuration Syntax
Format:
interface [interface-id]
 ip ospf [process-id] area [area-id]
Example:
interface gi0/0
 ip address 10.1.1.1 255.255.255.252
 ip ospf 1 area 0
What it does:
- Enables OSPF process 1 on this interface
- Assigns the interface to Area 0
- No network statement needed in
router ospfconfig
When to Use Interface-Based Configuration
✅ Use Interface-Based When:
1. Large configs with many interfaces
Easier to see which interfaces are in OSPF without matching wildcard masks.
2. Per-interface clarity
Reading the interface config immediately shows OSPF is enabled.
3. Multi-area configurations
Clearer which interface belongs to which area.
4. Automation/templates
Scripting interface configs is easier than calculating wildcard masks.
5. Mixed area assignments
When different interfaces on the same router are in different areas.
❌ Stick with Network Statements When:
1. Legacy configs
Maintaining consistency with existing configs.
2. Simple single-area networks
Network statements work fine for small setups.
3. Team preference
If your team uses network statements, stay consistent.
Configuration Example
Scenario:
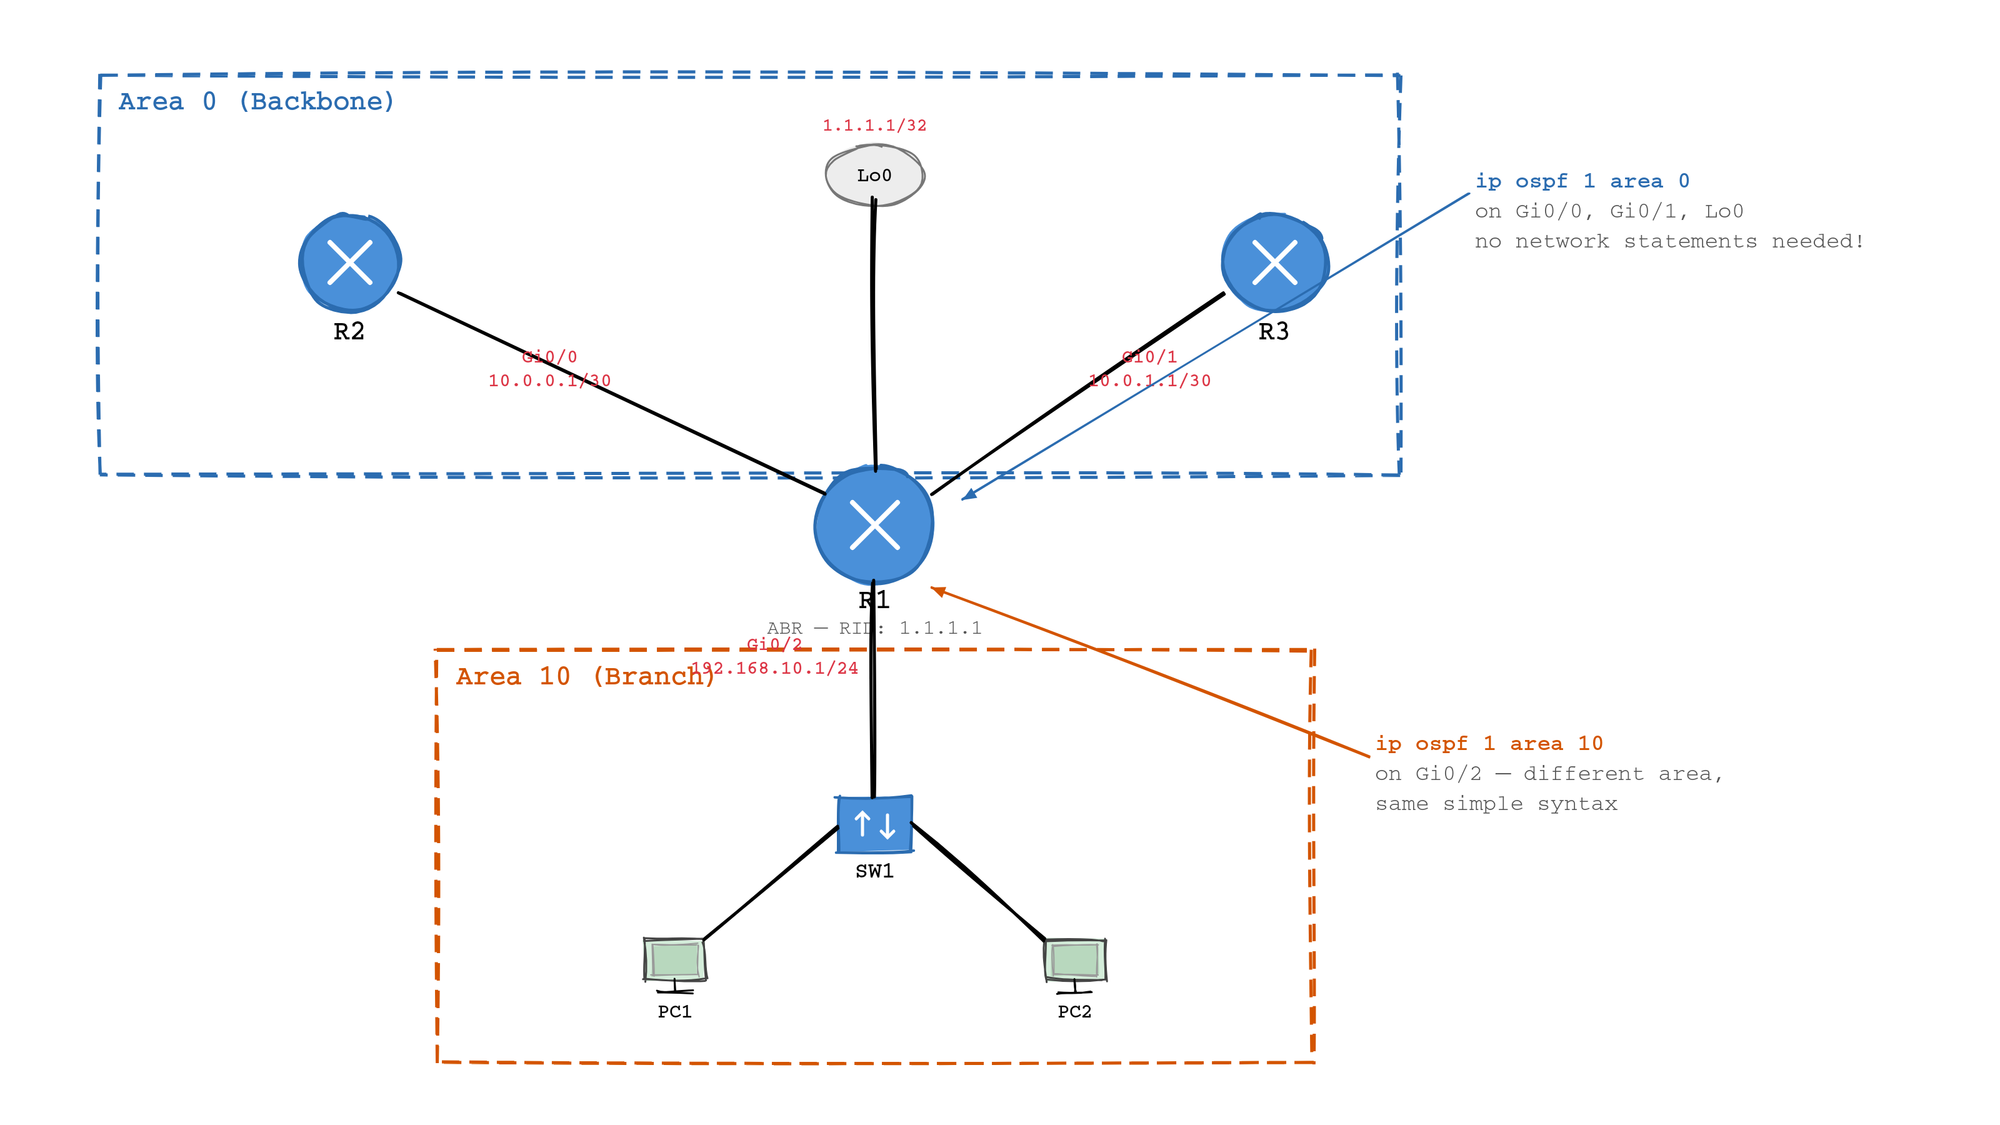
Router with 4 interfaces in different areas:
- Gi0/0: Area 0 (backbone)
- Gi0/1: Area 0 (backbone)
- Gi0/2: Area 10 (branch)
- Lo0: Area 0 (Router ID)
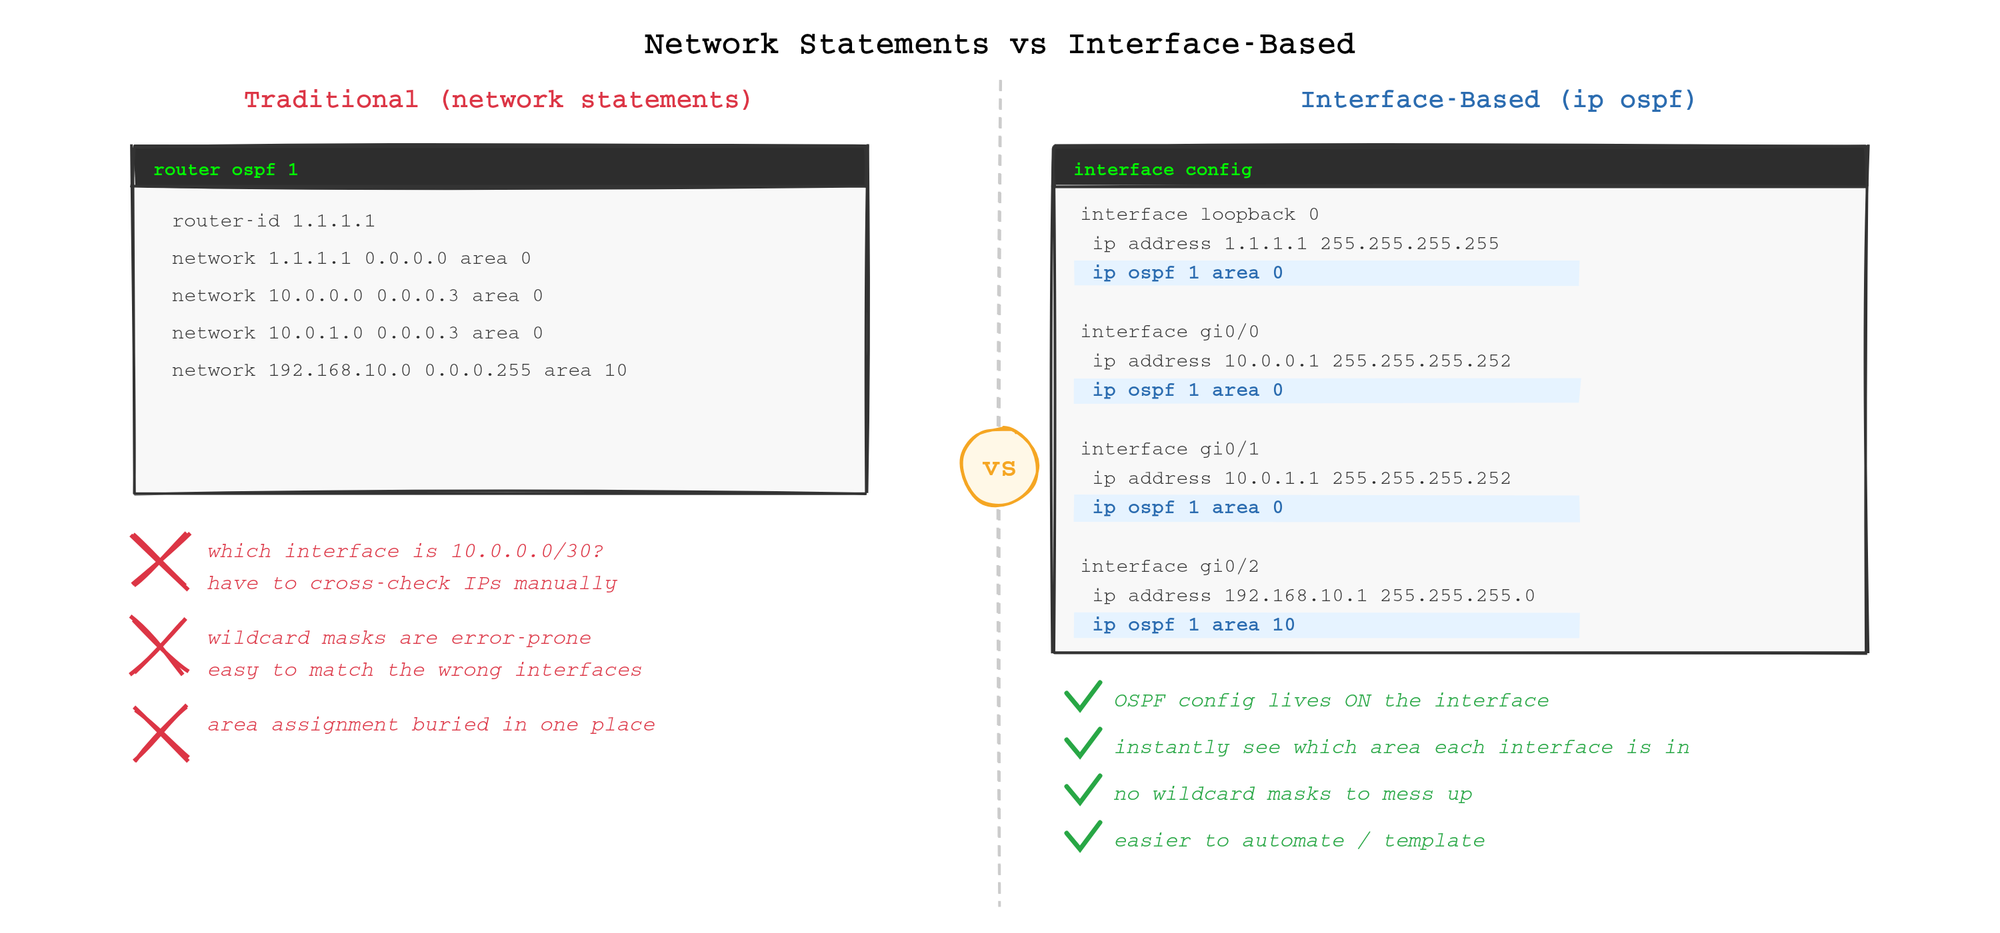
Traditional Method:
router ospf 1
 router-id 1.1.1.1
 network 1.1.1.1 0.0.0.0 area 0
 network 10.0.0.0 0.0.0.3 area 0
 network 10.0.1.0 0.0.0.3 area 0
 network 192.168.10.0 0.0.0.255 area 10
Problem: Not obvious which interface is which area without checking IPs.
Interface-Based Method:
interface loopback 0
 ip address 1.1.1.1 255.255.255.255
 ip ospf 1 area 0

interface gi0/0
 ip address 10.0.0.1 255.255.255.252
 ip ospf 1 area 0

interface gi0/1
 ip address 10.0.1.1 255.255.255.252
 ip ospf 1 area 0

interface gi0/2
 ip address 192.168.10.1 255.255.255.0
 ip ospf 1 area 10

router ospf 1
 router-id 1.1.1.1
Benefit: Immediately see which interface is in which area.
Mixing Both Methods (Not Recommended)
You can use both methods on the same router, but it's confusing:
interface gi0/0
 ip ospf 1 area 0

router ospf 1
 network 10.0.1.0 0.0.0.3 area 0
Result: Both work, but troubleshooting is harder.
Best practice: Pick one method and stick with it.
Additional Interface-Based Commands
Set OSPF Cost
interface gi0/0
 ip ospf cost 50
Set OSPF Priority (DR/BDR election)
interface gi0/0
 ip ospf priority 100
Set OSPF Network Type
interface gi0/0
 ip ospf network point-to-point
Set OSPF Timers
interface gi0/0
 ip ospf hello-interval 5
 ip ospf dead-interval 20
Benefit: All OSPF settings in one place (the interface config).
Verification
Check OSPF Interfaces
Router# show ip ospf interface brief
Interface    PID   Area            IP Address/Mask    Cost  State Nbrs F/C
Lo0          1     0               1.1.1.1/32         1     LOOP  0/0
Gi0/0        1     0               10.0.0.1/30        1     P2P   1/1
Gi0/1        1     0               10.0.1.1/30        1     P2P   1/1
Gi0/2        1     10              192.168.10.1/24    1     DR    2/2
Result: Same output whether you used network statements or ip ospf.
Check Detailed Interface Config
Router# show ip ospf interface gi0/0
GigabitEthernet0/0 is up, line protocol is up
  Internet Address 10.0.0.1/30, Area 0
  Process ID 1, Router ID 1.1.1.1
Check Running Config
Router# show run interface gi0/0
interface GigabitEthernet0/0
 ip address 10.0.0.1 255.255.255.252
 ip ospf 1 area 0
Clear indication that OSPF is enabled.
Converting from Network Statements to Interface-Based
Step 1: Document Current Config
Router# show ip ospf interface brief
Note which interfaces are in OSPF and their areas.
Step 2: Remove Network Statements
Router(config)# router ospf 1
Router(config-router)# no network 10.0.0.0 0.0.0.3 area 0
Router(config-router)# no network 10.0.1.0 0.0.0.3 area 0
Step 3: Add ip ospf Commands to Interfaces
Router(config)# interface gi0/0
Router(config-if)# ip ospf 1 area 0

Router(config)# interface gi0/1
Router(config-if)# ip ospf 1 area 0
Step 4: Verify
Router# show ip ospf neighbor
Router# show ip route ospf
Neighbors should reform and routes should reappear.
Troubleshooting
Problem: OSPF Not Enabled on Interface
Symptom:
Router# show ip ospf interface brief
(Interface missing)
Cause: Forgot to add ip ospf command.
Fix:
Router(config-if)# ip ospf 1 area 0
Problem: Wrong Area Assigned
Symptom: Neighbors not forming due to area mismatch.
Check:
Router# show ip ospf interface gi0/0 | include Area
  Internet Address 10.0.0.1/30, Area 10
Fix:
Router(config-if)# ip ospf 1 area 0
Best Practices
1. Use Interface-Based for Multi-Area Configs
When you have routers in multiple areas, interface-based makes it obvious:
interface gi0/0
 ip ospf 1 area 0

interface gi0/1
 ip ospf 1 area 10
2. Document in Descriptions
interface gi0/0
 description Uplink to Core - OSPF Area 0
 ip ospf 1 area 0
3. Combine with Passive Interfaces
interface gi0/1
 description User VLAN
 ip ospf 1 area 0

router ospf 1
 passive-interface gi0/1
Summary
Now you know:
✅ Interface-based OSPF — Configure with ip ospf [pid] area [id]
✅ When to use it — Multi-area, large configs, clarity
✅ How to verify — Same show commands work
✅ How to convert — Remove network statements, add ip ospf
✅ Best practices — Use for multi-area, document with descriptions
Next Step:
You've learned two ways to enable OSPF. Now learn how to configure the most important route in your network—the default route. Read How to Advertise a Default Route in OSPF next.
Internal Links:
- ← How to Configure Single-Area OSPF (Article 8)
- → How to Advertise a Default Route in OSPF (Article 11)
- → Configuring Multi-Area OSPF (Article 12)