You upgraded to Cisco Modeling Labs 2.10, mounted the latest reference platform package, and the new Docker node types showed up in the palette: Chrome, Firefox, Splunk, Syslog, TACACS+, nginx, Snort, dnsmasq, and the rest. Then you dragged one onto the canvas, hit start, and nothing. The node sits there. Open the node and image definitions and you see the node definition is present, but the image definition is empty.
This trips up a lot of people (it comes up regularly in the CML community), and the fix is not obvious, because the container images are shipped separately from the main reference platform. Here is exactly what is happening and how to install them.
The symptom: node definition yes, image definition no
In CML, every node type is two pieces:
- Node definition - the metadata: how many interfaces, default RAM, boot behavior, the icon in the palette.
- Image definition - the actual disk image or container the node boots from.
The standard 2.10 reference platform package gives you the node definitions for the Docker containers, so they appear in the palette and look ready to use. But the container images themselves are not in that package. With no image definition behind it, the node will not launch. Depending on how you start it you will see it fall straight back to a stopped state, or a plain "no image definition" complaint.
If you went looking in Tools > Node and Image Definitions and found the container under Node Definitions but nothing under Image Definitions, that is the whole problem in one screen.
Why: the container images are a separate download
The Docker containers that landed in CML 2.9 and 2.10 (the lightweight, fast-booting alternatives to full VMs) are built and published in their own repository, not bundled into the main refplat ISO. Cisco ships them as a set of reference platform ISOs on GitHub:
👉 github.com/CiscoLearning/cml-docker-containers/releases/tag/v0.3.0 (CML 2.10.0 container ISOs, v0.3.0)
That release splits the containers across three ISOs so you only download what you need. Here is the full inventory, which is handy if you are searching for a specific one:
For most people the one you want is refplat-20260507-services.iso. It carries the workhorses: net-tools, nginx, dnsmasq, FRR, RADIUS, TACACS+, Syslog-NG, Snort, and the ThousandEyes agent. Grab the browser ISO if you want Chrome or Firefox, and the splunk ISO only if you specifically need Splunk (it is large).
Installing the images from the CML backend (Cockpit, port 9090)
You do this from Cockpit, the CML controller's system administration interface, using the built-in Copy Refplat ISO action. No terminal needed.
Stop your labs first. The import restarts the CML services, so it will refuse to run while any nodes are powered on.
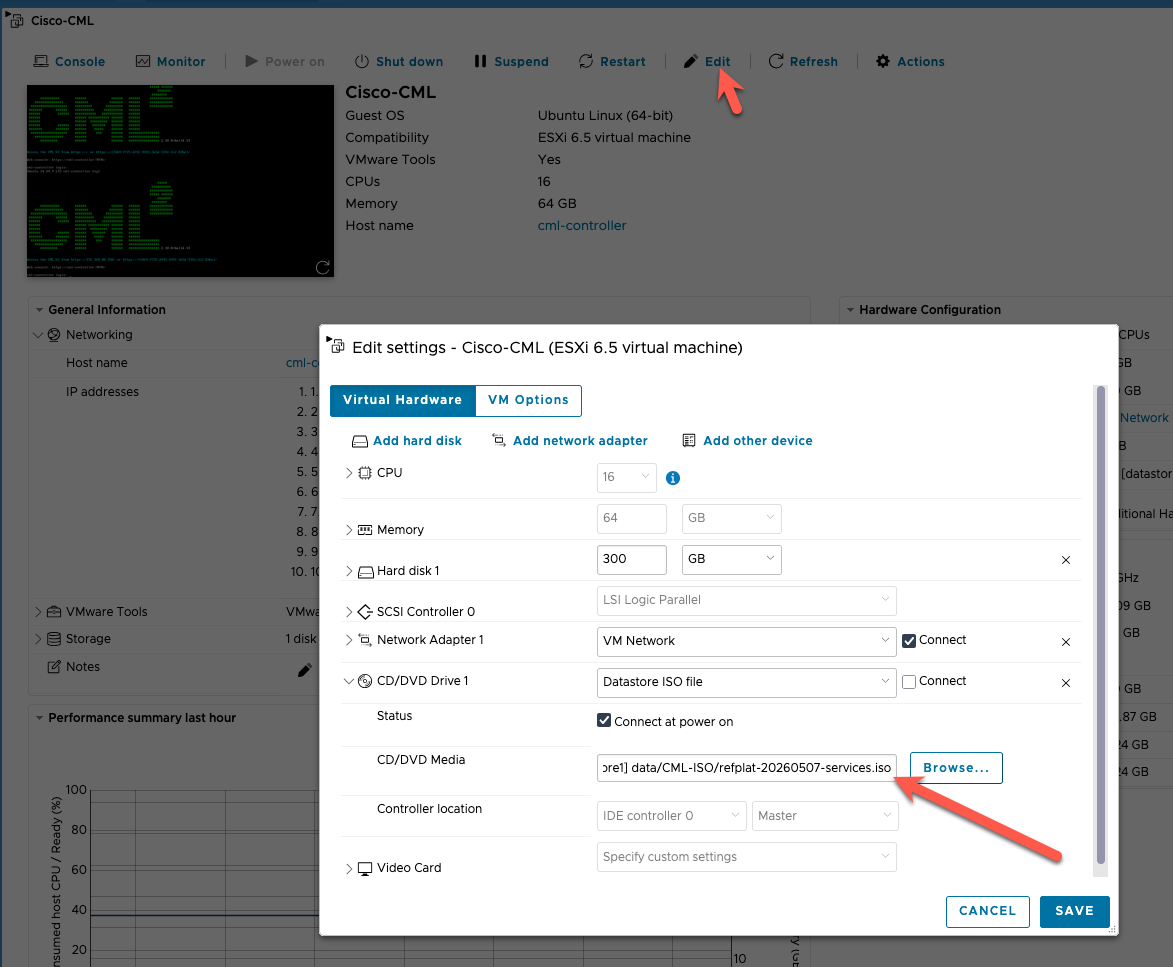
1. Mount the ISO to the CML virtual machine. Download the ISO you need from the GitHub release (the services ISO covers most people). Then attach it to the CML VM's CD/DVD drive in your hypervisor. In VMware (ESXi, Workstation, or Fusion): edit the CML VM's settings, set the CD/DVD drive to Use ISO image file, browse to refplat-20260507-services.iso, and make sure Connected and Connect at power on are ticked. (On a bare-metal install, present the ISO as optical media however your platform allows.)
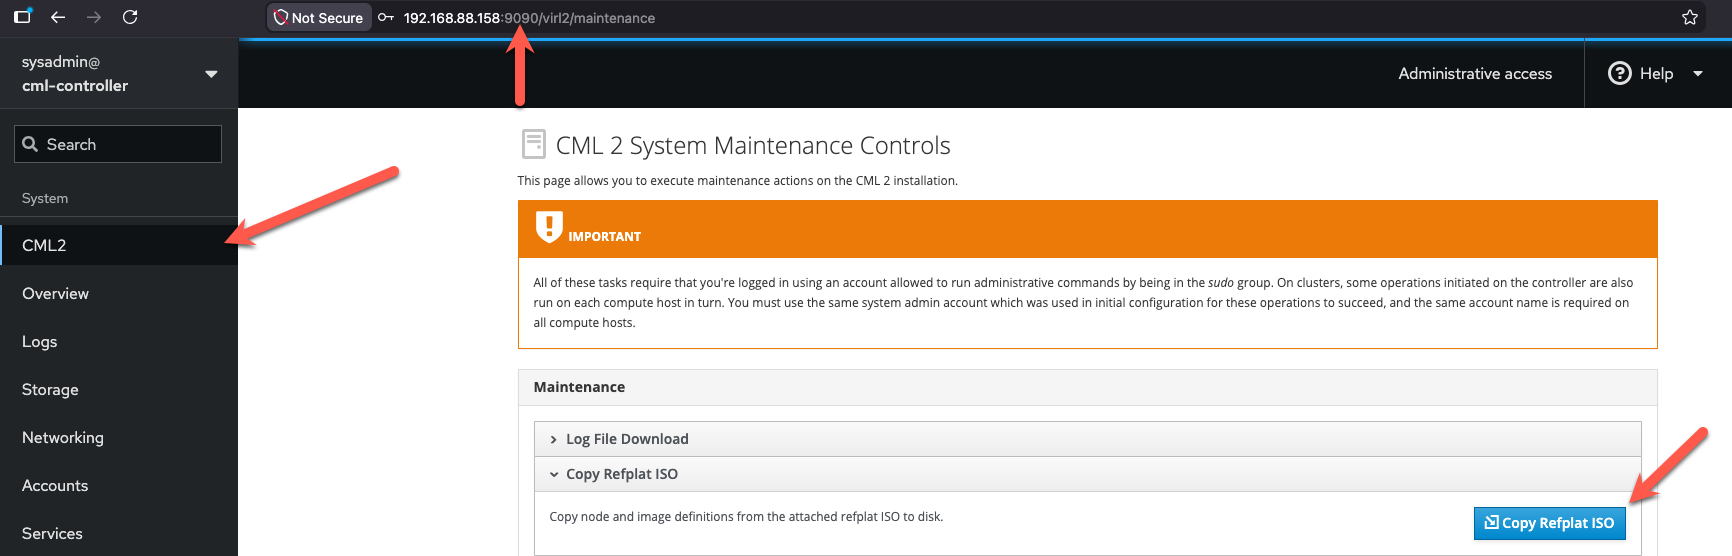
2. Open Cockpit and go to System > CML2. Browse to https://<your-cml-ip>:9090 and sign in with your sysadmin account (not the usual cml2 lab user). In the left sidebar under System, click CML2 to open the System Maintenance Controls.
3. Click Copy Refplat ISO. Under the Maintenance section, expand Copy Refplat ISO and click the blue Copy Refplat ISO button. It copies the node and image definitions (and the container image tarballs) from the mounted ISO to disk, then restarts the CML services.
4. Refresh. Give the services a moment to restart, then reload the CML web UI.
(On a headless or bare-metal controller where mounting a CD is awkward, the same import is available from the shell as sudo copy-refplat-iso-to-disk.sh <iso>, but the Copy Refplat ISO button above is the easier path for most installs.)
Verify it worked
Back in the CML web UI, open Tools > Node and Image Definitions and find the container, for example net-tools or tacplus. This time there should be an image definition listed under it (something like net-tools-2-10-1-3). Drag the node into a lab and start it. It should boot in seconds, the way a lightweight container should, instead of dropping back to stopped.
Gotchas worth knowing
- Stop all labs before importing. The copy fails if any nodes are running, and the service restart will stop them anyway.
- The node definition being present is a red herring. Seeing the container in the palette does not mean the image is installed. Always check for the image definition.
- Match the release to your CML version. The v0.3.0 ISOs are built for CML 2.10. Use the release that matches your install.
- Splunk is its own ISO for a reason. At 1.8 GB it dwarfs everything else. Skip it unless you need it.
- Personal vs Enterprise does not matter here. This is the same process on CML Personal and Enterprise; the images are free to download from the GitHub release.
Key takeaways
- In CML 2.10, the Docker container node definitions ship with the reference platform, but the image definitions do not.
- The container images live in a separate GitHub release: cml-docker-containers v0.3.0, split into browser, services, and splunk ISOs.
- Mount the ISO to the CML VM, then in Cockpit open System > CML2 > Copy Refplat ISO and click it, with all labs stopped.
- Confirm the fix by checking that an image definition now exists, then boot the node.
Once these are in, the containers are genuinely useful: net-tools gives you nmap and tshark in the lab, dnsmasq and TACACS+ stand in for real services, and Snort lets you watch traffic. We lean on them heavily in our hands-on labs.