
I wanted a Cisco Catalyst 9800 controller I could boot alongside my other Containerlab nodes, configure from the CLI, and open in a browser. The QCOW2 image was already available. Getting it into a usable Containerlab lab took a custom launcher, a few management-interface fixes, and some time looking at the virtual display instead of the serial console.
This write-up records the build that got the C9800-CL running IOS XE 17.18.02 to a working, authenticated web dashboard. It uses Containerlab’s generic_vm kind and an adapted vrnetlab IOS XE launcher. It is a local integration, not a dedicated upstream 9800 kind or a Cisco-supported Containerlab deployment.
The result is a useful controller GUI and configuration lab. I have not joined a physical access point, passed wireless client traffic, or tested HA with this setup. The zero APs and clients in the screenshot are the expected result of that scope.
The lab and the management path
The controller runs as a QEMU virtual machine inside a Docker container. Containerlab creates and manages the container; vrnetlab supplies the VM launcher and interface plumbing. A Docker image tag such as vrnetlab/cisco_cat9800 is just the local image name. The topology kind is still generic_vm.
- Linux x86-64 lab host with working KVM; nested virtualization must be available if that host is itself a VM.
- Containerlab
0.79.0and the srl-labs vrnetlab checkout pinned below. - Cisco disk:
C9800-CL-universalk9.17.18.02.qcow2, obtained through your own Cisco access and used under the applicable entitlement. No Cisco disk or built appliance image is supplied here. - Controller allocation: 2 vCPUs, 6144 MiB RAM, virtio disk and NICs, four guest Ethernet interfaces. Leave additional RAM and disk space for the Linux host and Docker build layers.
Those resources produced the Ultra Low VM profile shown in the dashboard. They describe this tested management lab, not a sizing recommendation for a production wireless deployment. Cisco documents the underlying KVM profiles in its 9800-CL installation guide.
For browser access, the path is: browser → lab-host TCP 8443 → container TCP 443 → guest HTTPS. Inside the QEMU guest, GigabitEthernet1 uses 10.0.0.15/24 in VRF Mgmt-intf. That is an internal forwarding address. Your browser connects to the lab host’s address, not directly to that guest address.
Build the custom vrnetlab image
Run the build commands on the Linux lab host. Start from the same upstream revision so the adaptation below has a known input. A newer launcher may need different changes; the script stops if an expected source fragment is missing.
git clone https://github.com/srl-labs/vrnetlab.git vrnetlab-9800
cd vrnetlab-9800
git checkout da55d7cf48c1674422100a3bec2612f375dc1f4f
mkdir -p custom-cat9800
cp cisco/csr1000v/docker/launch.py custom-cat9800/launch.py
cp common/vrnetlab.py common/healthcheck.py custom-cat9800/
cp LICENSE custom-cat9800/LICENSE.vrnetlab
cd custom-cat9800

# Copy your own QCOW2 into this directory, keeping this filename:
# C9800-CL-universalk9.17.18.02.qcow2
The CSR launcher was a useful starting point because it already builds an IOS XE configuration ISO. The changes that mattered were the VM hardware settings, the management interface configuration, and readiness detection. Save the following as adapt-launcher.py in the build directory, then run it once against the copied launcher. This script reproduces the launcher source installed in my lab.
from pathlib import Path

path = Path('launch.py')
source = path.read_text()
changes = {
    'import signal\n': 'import signal\nimport socket\n',
    'super(CSR_vm, self).__init__(username, password, disk_image=disk_image)':
        'super(CSR_vm, self).__init__(username, password, disk_image=disk_image, ram=6144, smp="2", driveif="virtio", min_dp_nics=3)',
    'self.nic_type = "vmxnet3"': 'self.nic_type = "virtio-net-pci"',
    'self._static_mgmt_mac = True': 'self._static_mgmt_mac = False',
    'return "c0:00:01:00:ca:fe"': 'return super().get_mgmt_mac()',
    'return f"""hostname {self.hostname}': 'return f"""platform console serial\nhostname {self.hostname}',
    'clab-mgmt': 'Mgmt-intf',
    'interface GigabitEthernet 1\ndescription':
        'interface GigabitEthernet1\nno switchport\ndescription',
    'rsa modulus 2048': 'rsa modulus 3072',
    'transport input all': 'transport input ssh',
    'restconf\nnetconf-yang\n!\n':
        'ip http authentication local\nip http secure-server\nrestconf\nnetconf-yang\n!\nend\n',
    'default="csr1000v"': 'default="cat9800"',
    'default=31': 'default=3',
    'default="vrxcon"': 'default="tc"',
    'logger.setLevel(logging.DEBUG)': 'logger.setLevel(logging.INFO)',
    'logger.setLevel(1)': 'logger.setLevel(logging.INFO)',
}
for old, new in changes.items():
    if old not in source:
        raise SystemExit(f'Upstream source mismatch: {old!r}')
    source = source.replace(old, new)
source = source.replace('"\\.license$"', 'r"\\.license$"')
start = source.index('    def bootstrap_spin(self):')
stop = source.index('    # Override management MAC', start)
source = source[:start] + '''    def bootstrap_spin(self):
        """Wait for the actual guest SSH service; first boot may use VGA."""
        try:
            with socket.create_connection(("127.0.0.1", 22), timeout=1) as probe:
                probe.settimeout(1)
                banner = probe.recv(256)
            if banner.startswith(b"SSH-"):
                self.logger.info("Startup complete: guest SSH service is ready")
                self.running = True
                return
        except OSError:
            pass
        sleep(2)

''' + source[stop:]
compile(source, str(path), 'exec')
path.write_text(source)
print('Adapted launcher written.')
python3 adapt-launcher.pyThe generated bootstrap enables local SSH login, a 3072-bit RSA key, SSH-only VTY access and HTTPS with local authentication. It also enables NETCONF and RESTCONF, although those APIs were not part of this verification. The no switchport line is essential on the management interface; I will come back to that failure below.
Add the guest-aware health check
A listening Docker port is too weak a readiness test. QEMU opens its forwarding socket before IOS XE is ready behind it. Save this as healthcheck.py, replacing the copied generic check. It requires an actual SSH banner from the guest.
#!/usr/bin/env python3
"""Require a guest SSH banner, not merely QEMU's listening socket."""
import socket
import sys
try:
    with socket.create_connection(("127.0.0.1", 22), timeout=2) as probe:
        probe.settimeout(2)
        ready = probe.recv(256).startswith(b"SSH-")
except OSError:
    ready = False
print("Guest SSH ready" if ready else "Guest is booting or SSH is unavailable")
sys.exit(0 if ready else 1)
An SSH banner is still only a service check. In this lab it appeared briefly before the final interface state was stable. Keep the authenticated CLI and HTTPS checks later in the post as the acceptance test.
Build the image
Save this as Dockerfile. The base image supplies QEMU and the vrnetlab runtime. The vendor disk stays on your own host.
FROM ghcr.io/srl-labs/vrnetlab-base:0.3.0
ENV VERSION=17.18.02
COPY C9800-CL-universalk9.17.18.02.qcow2 /
COPY *.py /
EXPOSE 22 443 830 5000 10000-10099
docker build -t vrnetlab/cisco_cat9800:17.18.02 .
docker image inspect vrnetlab/cisco_cat9800:17.18.02 \
--format '{{.RepoTags}} {{.Os}}/{{.Architecture}}' Build-layer export and unpacking took several minutes on my VM. A completed image build means Docker has packaged the disk and launcher; it does not prove that IOS XE booted or that the web GUI works. This adapter uses a configuration ISO at runtime. I did not run the CSR builder’s separate installation target for the 9800.
Create a one-node Containerlab topology
Create a lab directory outside the build context. On the Linux host, choose its reachable LAN address and a new password for this lab. These Bash prompts avoid putting the password value into the command history.
mkdir -p ~/labs/cat9800
cd ~/labs/cat9800
read -rp "Lab host LAN IP for HTTPS: " LAB_BIND_IP
export LAB_BIND_IP
read -rsp "Choose the lab admin password: " WLC_PASSWORD
echo
export WLC_PASSWORD
Save the following as cat9800.clab.yml. The host address in ports is the address you just entered. Port 8443 must be free. The environment variables must be present in the process that runs Containerlab.
name: cat9800
topology:
  nodes:
    wlc:
      kind: generic_vm
      image: vrnetlab/cisco_cat9800:17.18.02
      ports:
        - "${LAB_BIND_IP}:8443:443"
      env:
        USERNAME: admin
        PASSWORD: "${WLC_PASSWORD}"
There is deliberately no data link in this first lab. The launcher provides three additional guest NICs so the controller sees four interfaces in total. Those NICs do not connect an AP or put the controller on your physical wireless network. When adding data links to generic_vm, use eth1, eth2, and so on; see the Containerlab generic VM documentation.
# Preserve just the two variables needed by this topology when using sudo.
sudo --preserve-env=LAB_BIND_IP,WLC_PASSWORD \
  containerlab validate -t cat9800.clab.yml
sudo --preserve-env=LAB_BIND_IP,WLC_PASSWORD \
  containerlab deploy -t cat9800.clab.yml
sudo containerlab inspect -t cat9800.clab.yml
docker logs -f clab-cat9800-wlc
Use Ctrl-C to detach from the log stream; that does not stop the controller. Fresh boots took roughly seven minutes in this lab. Docker may mark the container unhealthy while IOS XE is initializing. Investigate a persistent failure, but do not treat a two-minute health timeout as proof that the VM cannot boot.
The first problem: the console stopped talking
The early serial output reached the chassis messages and then went quiet. The guest was still booting. Its usable first-boot console was on the virtual VGA display, even though the configuration included platform console serial. Waiting forever for CVAC-4-CONFIG_DONE on serial made a working controller look stuck.
That is why the adapted launcher checks the SSH banner without a blocking serial read. It is also why a VGA fallback is useful when management is not reachable. Cisco describes the controller’s console options in Booting the Controller and Accessing the Console.
A VGA fallback for this wrapper
I used QEMU’s monitor to inspect the display and type console commands. The small helper below sends keyboard events to VGA and saves a screen dump. Save it on the lab host as console.py. It handles the characters used in the recovery commands below; it is not a general terminal emulator.
import socket,time,sys
s=socket.create_connection(('127.0.0.1',4000));s.settimeout(1);s.recv(4096)
for ch in sys.stdin.read():
 if ch.isupper():key='shift-'+ch.lower()
 else:key={' ':'spc','\n':'ret','-':'minus','/':'slash','.':'dot',':':'shift-semicolon','|':'shift-backslash','_':'shift-minus'}.get(ch,ch)
 s.sendall(('sendkey '+key+'\n').encode());time.sleep(.08)
 try:s.recv(16384)
 except TimeoutError:pass
 time.sleep(.02)
time.sleep(2);s.sendall(b'screendump /tmp/cat9800.ppm\n');time.sleep(.5);s.close()
The launcher normally holds the monitor connection. On this isolated node, I released that connection before attaching the helper. This disconnects the launcher’s monitor client; it does not stop the guest. Do not use this procedure during a snapshot or another operation that needs that monitor connection.
docker exec clab-cat9800-wlc \
  ss -K dst 127.0.0.1 dport = 4000 >/dev/null 2>&1 || true
docker cp console.py clab-cat9800-wlc:/tmp/console.py
The second problem: no management IP
The first management configuration failed because GigabitEthernet1 started as a switchport. IOS XE rejected the routed IP and VRF commands. Changing it to a routed interface with no switchport allowed those commands to work. The build script includes that fix.
On a later fresh boot, the interface still ended up in DHCP mode with no address. SSH had appeared briefly during startup, then timed out. I restored the static address from VGA and saved the configuration. I did not establish the cause of the DHCP change, so this remains a bootstrap caveat rather than a claimed permanent fix in the image.
If you see that symptom, run this on the Linux host to enter the recovery commands through VGA:
docker exec -i clab-cat9800-wlc python3 /tmp/console.py <<'EOF'

enable
configure terminal
interface GigabitEthernet1
no switchport
vrf forwarding Mgmt-intf
no ip address dhcp
ip address 10.0.0.15 255.255.255.0
no shutdown
exit
ip route vrf Mgmt-intf 0.0.0.0 0.0.0.0 10.0.0.2
end
write memory
EOF

docker cp clab-cat9800-wlc:/tmp/cat9800.ppm ./cat9800-console.ppm
Open the PPM image in a compatible image viewer to inspect the console result. The expected management state is GigabitEthernet1 10.0.0.15 up up. This is the internal guest address used by the wrapper’s forwarding, not an arbitrary LAN address to reuse elsewhere.
Once management responds, use ssh admin@<container-management-ip> from the Linux host. The IP comes from containerlab inspect. Enter the password chosen earlier. docker exec ... bash opens the wrapper’s Linux shell, not the IOS XE CLI.
Apply the initial GUI lab configuration
The following commands run in the controller CLI. I used US country code and Pacific time because they fit this lab; choose the country and timezone appropriate to your own setup. GigabitEthernet2 uses an isolated documentation subnet for exploring the controller. It is not connected to a real AP network.
configure terminal
hostname WLC-LAB
clock timezone PST -8 0
clock summer-time PDT recurring
wireless country US
interface GigabitEthernet2
no switchport
description Isolated wireless management for GUI lab
ip address 192.0.2.1 255.255.255.0
no shutdown
exit
wireless management interface GigabitEthernet2
end
write memory
The bootstrap already enables HTTPS and local authentication. These commands set a wireless-management interface and country so there is a useful baseline for exploring the GUI. No SSID, client policy, AP join certificate workflow, or physical AP connectivity was validated here.
Verify the CLI and open the web GUI
These are excerpts from the working controller, after the static-management recovery and initial settings:
WLC-LAB#show version | include Cisco IOS XE Software
Cisco IOS XE Software, Version 17.18.02

WLC-LAB#show ip interface brief
Interface              IP-Address      OK? Method Status                Protocol
GigabitEthernet1       10.0.0.15       YES manual up                    up
GigabitEthernet2       192.0.2.1       YES manual up                    up

WLC-LAB#show wireless country configured
Configured Country..........................   US - United States
For HTTPS, open https://<lab-host-ip>:8443 from your browser. Use admin and the password you chose for this lab. The controller presents a self-signed certificate; inspect the expected destination before proceeding through your browser’s warning.
A quick reachability check from your workstation is:
curl -k --connect-timeout 5 --max-time 15 \
  -o /dev/null -w 'HTTP %{http_code}\n' \
  https://<lab-host-ip>:8443/
The -k option is for this lab’s self-signed certificate. HTTP 200 from the login page alone is not a login test. I also verified authenticated SSH, fetched the authenticated web application successfully, and opened the dashboard shown below.
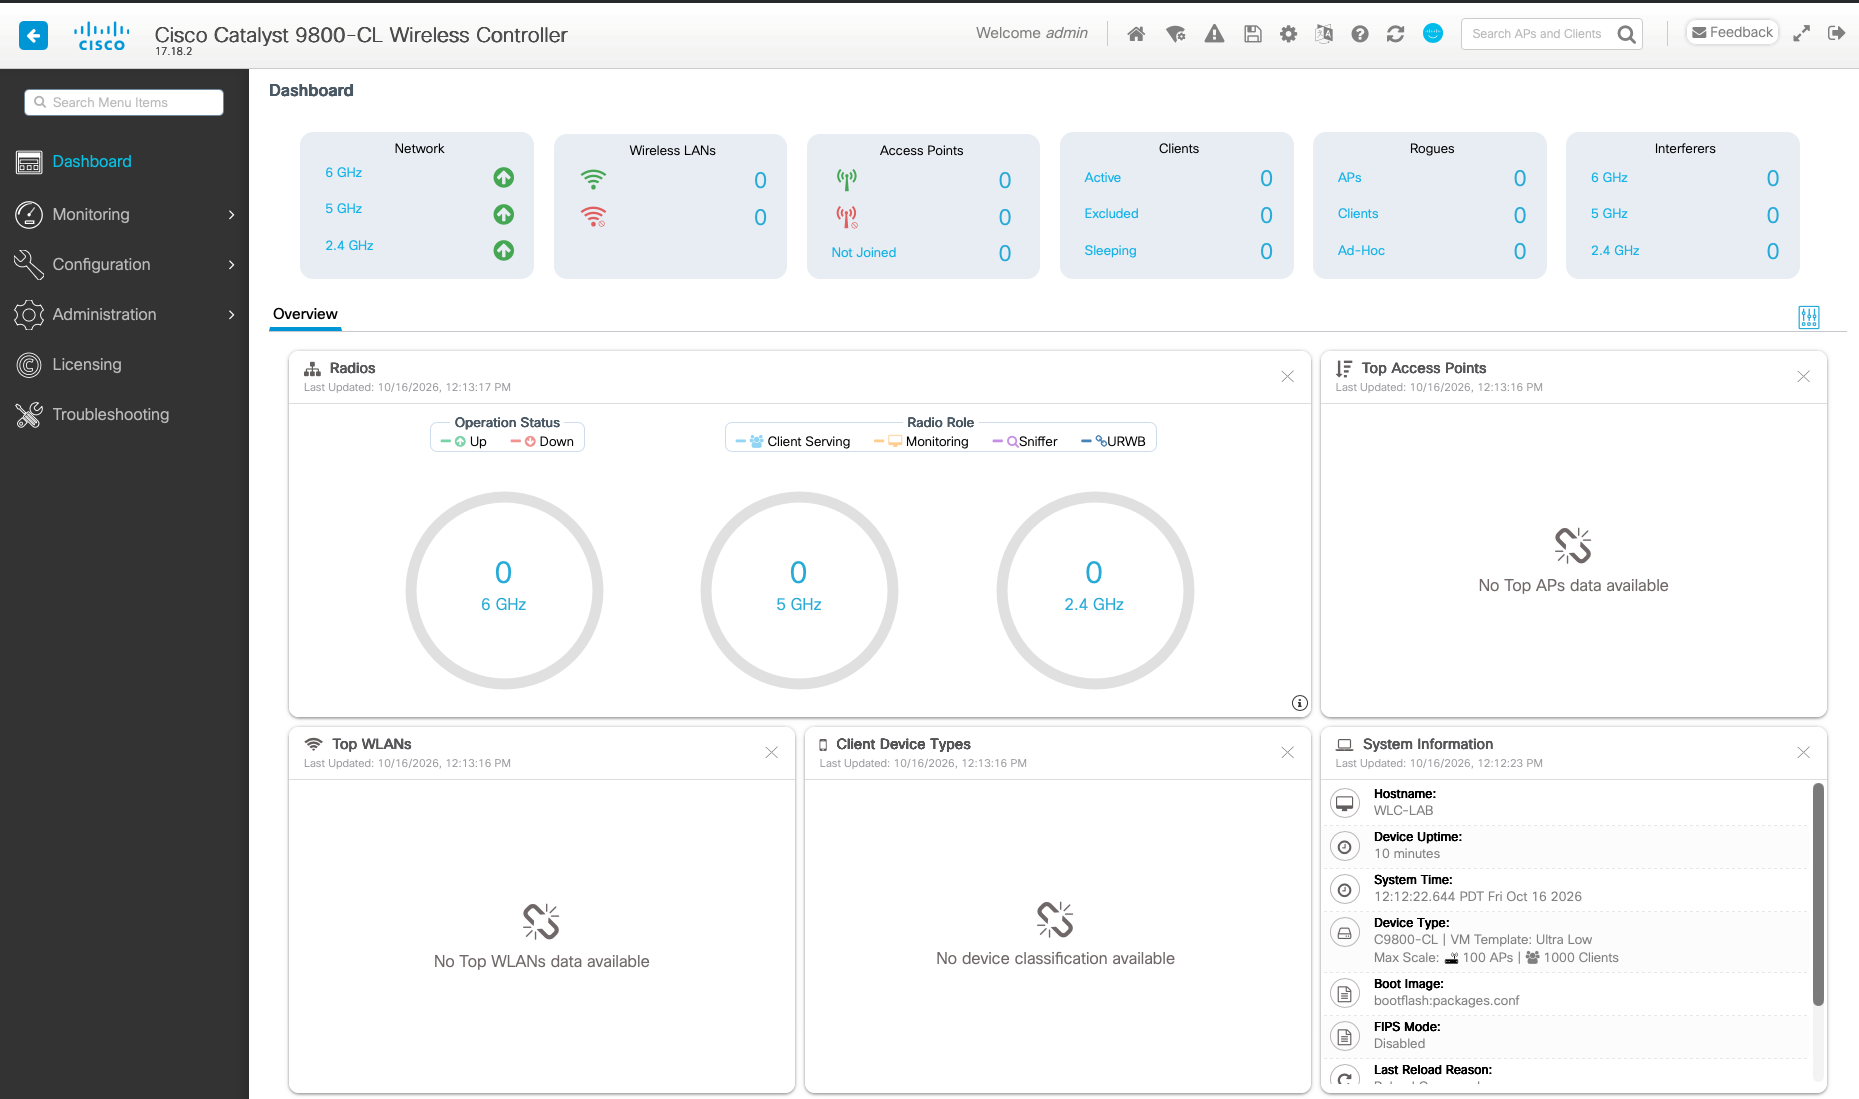
The System Information panel identifies the C9800-CL and its Ultra Low profile. The zero counters do not indicate a failed install: no APs or wireless clients were attached to this topology.
What this lab gives you next
The useful result is a real IOS XE controller CLI and web GUI that can sit alongside the rest of a Containerlab lab. You can inspect the menus and work through configuration exercises without claiming that a wireless data path exists behind them. Save changes with write memory, and export configurations you want to retain before replacing the container: runtime changes live in its guest disk overlay.
For the next configuration exercise, start with C9800 initial setup and the 9800 tags, profiles and policies model. Joining an actual AP is a separate lab: it needs reachable wireless management, compatible software, certificates and the appropriate traffic path. This install has not verified those pieces.