How to Configure Hostname on Cisco Router (Step-by-Step Guide)
Learn how to configure a hostname on your Cisco router using simple CLI commands. This guide explains why hostnames matter, how to save changes, and best practices for network organization.

To change your Cisco router's hostname, first enter privileged mode with "enable," then access configuration mode with "configure terminal." Set the new name using the "hostname [name]" command (e.g., hostname DataCenter1). Your prompt will immediately update to reflect this change. Save your configuration with "write memory" or "copy running-config startup-config" to make it permanent. Implementing meaningful naming conventions enhances network management and simplifies device identification throughout your infrastructure.
Importance of Hostnames in Network Management
Organization forms the foundation of effective network management, and proper hostname configuration plays an essential role in this structure. When you implement descriptive hostnames, you're no longer dependent solely on IP addresses for device identification, making troubleshooting considerably more efficient.
Your network benefits from consistent naming conventions, whether location-based or function-based, as they reduce errors during problem resolution and clarify your network topology. The hostname configuration on Cisco devices creates logical identifiers that streamline documentation and tracking of network changes.
With well-structured hostnames, you'll experience improved communication among your team members and faster device identification. This systematic approach to device labeling contributes directly to overall network organization, ultimately enhancing performance by reducing time spent searching for specific equipment during critical maintenance tasks.
Steps to Change Hostname on Cisco Router
Changing your Cisco router's hostname requires just a few simple commands executed in the correct sequence.
First, access the privileged EXEC mode with the "enable" command, then enter global configuration mode by typing "configure terminal" or "conf t" for short.
Once in global configuration mode, use the hostname global configuration command followed by your desired device identifier. For example:
Router# enable
Router# configure terminal
Router(config)# hostname DataCenter1
DataCenter1(config)#
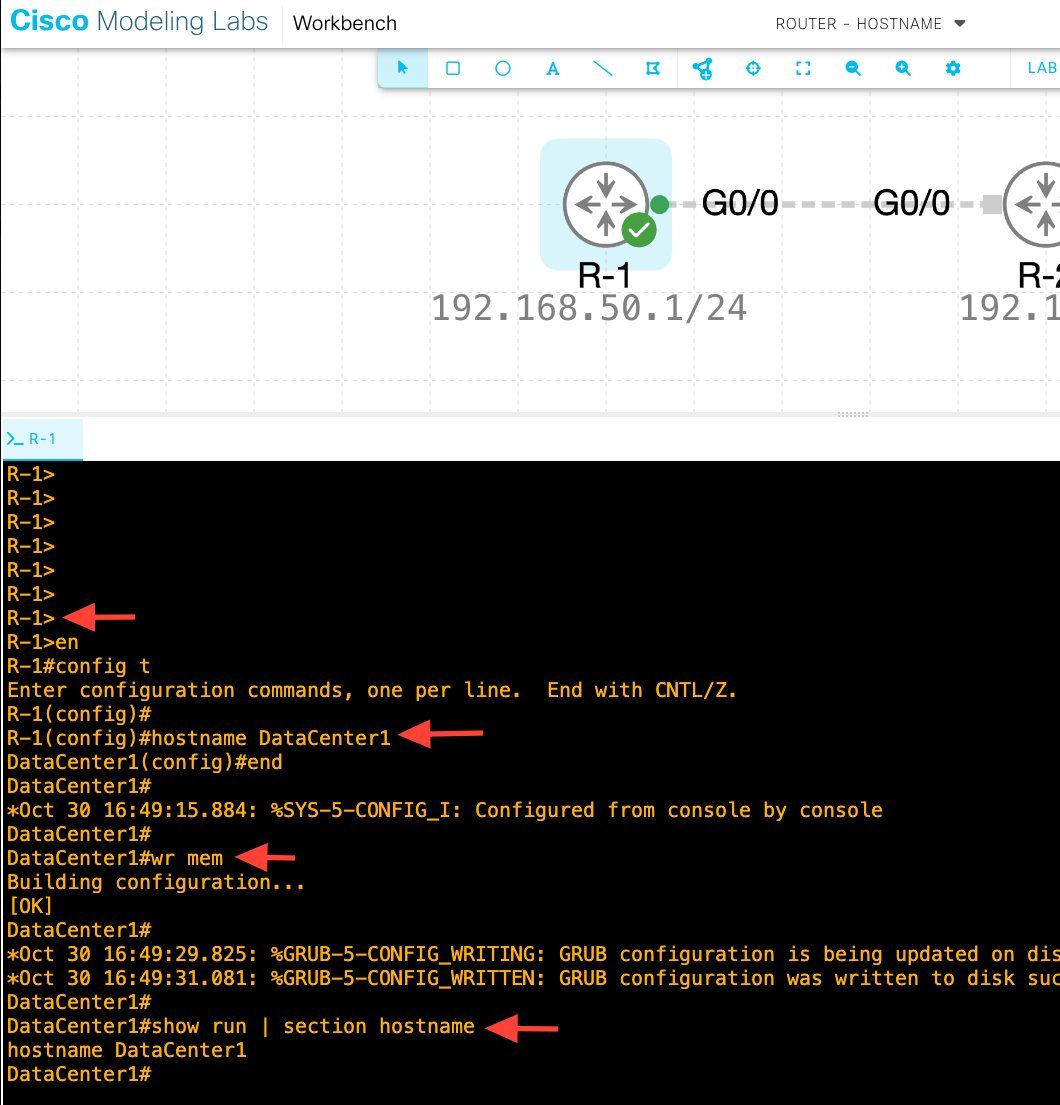
Notice how the prompt immediately changes to reflect your new hostname.
To guarantee this change persists after a reboot, save your configuration by executing "write memory" or "copy running-config startup-config" before exiting.
Following organized naming conventions will significantly improve network management and troubleshooting efficiency.
Examples of Effective Hostnames
Choosing effective hostnames for your Cisco routers greatly improves network management and troubleshooting efficiency. When configuring your Cisco router's hostname, it is beneficial to use consistent naming conventions that clearly communicate device information.
Consider location-based names, such as "Office-Core," to identify the physical location of devices. Function-based hostnames such as "Distribution" immediately clarify each router's role in your network. If you need to track manufacturer details or vendor-based names, such as "Cisco-Router-01," this provides instant identification.
For systematic inventory management, implement number-based hostnames incorporating serial numbers (e.g., "SW-01-0001"). In environments with dedicated equipment, user-based names, such as "Johns-Router," enhance accountability.
Remember to save your hostname configuration using the "wr" command to preserve changes after reboots.
Saving Configuration Changes
After setting a new hostname on your Cisco router, you must save these changes to prevent them from being lost during a reboot or power cycle. The configuration you've created exists only in running memory until it is explicitly saved to NVRAM.
To save your configuration, use the write memory command or its shortened form wr while in privileged EXEC mode. This transfers all current settings, including your new hostname, from running memory to non-volatile storage.
You can verify your saved configuration using the show running-config command, which displays all active settings. If you don't save your changes, your router will revert to its previous hostname when restarted.
Make saving configurations a regular practice to guarantee your network device identifiers remain consistent and prevent unexpected configuration loss.
Verifying Hostname Change
Proper verification serves as an essential step after changing your router's hostname to confirm the modification has taken effect throughout the system.
You'll notice the CLI prompt immediately reflects your new hostname, providing initial confirmation.
To formally verify the change, execute the show running-config command, which displays the current configuration, including the hostname line near the beginning of the output.
For additional validation, run show version to see the hostname alongside other system information.
If the hostname doesn't appear as expected, make sure you've saved your configuration using write memory or copy running-config startup-config.
These commands preserve your hostname change after device reboots.
For thorough verification, check the system messages show logging to confirm the hostname change was recorded correctly in the router's logs.
Frequently Asked Questions
How to Configure Hostname in Cisco Router?
Enter privileged EXEC mode with "enable", then type "configure terminal" to access global configuration mode. Use "hostname [your_name]" to set the desired name. Save with "write memory" command.
How to Change Host Name in Router?
To change your router's hostname, enter privileged EXEC mode with "enable," then type "configure terminal," followed by "hostname [new_name]." Save your configuration with "write memory" to preserve the change after reboots.
How Do You Configure a Hostname?
To configure a hostname, you'll first enter privileged EXEC mode with "enable," then access configuration mode using "configure terminal." Next, type "hostname [new_name]" and save your changes with "write memory" or "wr."
How to Change Hostname via CLI?
To change the hostname via CLI, enter privileged EXEC mode with "enable," then use "configure terminal" to access global configuration mode. Type "hostname YourNewName" and save with "write memory" or "copy running-config startup-config."